Anim Blueprint Logic in Code
Epicmetheus created Blueprints to resemble Code. C++, king of Olympus and ruler of all Code, deemed this as a transgression. Living a happy and simple life, Blueprints, weak and hideous as they are, still harbor dreams of one day rivaling the power of C++ himself. They often spend their days whimsically playing with us, mere mortals. It is, for this very reason, that C++ despises Blueprints and looks down on them from the heights of Mount Performance.
I’ve been playing Hades.
Here I’ll show you how to use Anim Blueprint nodes from code. Is that worth doing? Not usually, it’s way simpler to do it from Blueprint. But it’s a handy tool in case you want to hide some complexity under the hood and expose only a pretty node in the editor.
I won’t cover the basics of doing custom animation nodes. You can find that in this post by Unreal. I would also highly recommend reading the full Animation Node Technical Guide. I will also show only the relevant code bits. You can find the full code here so you can browse at your own pace.
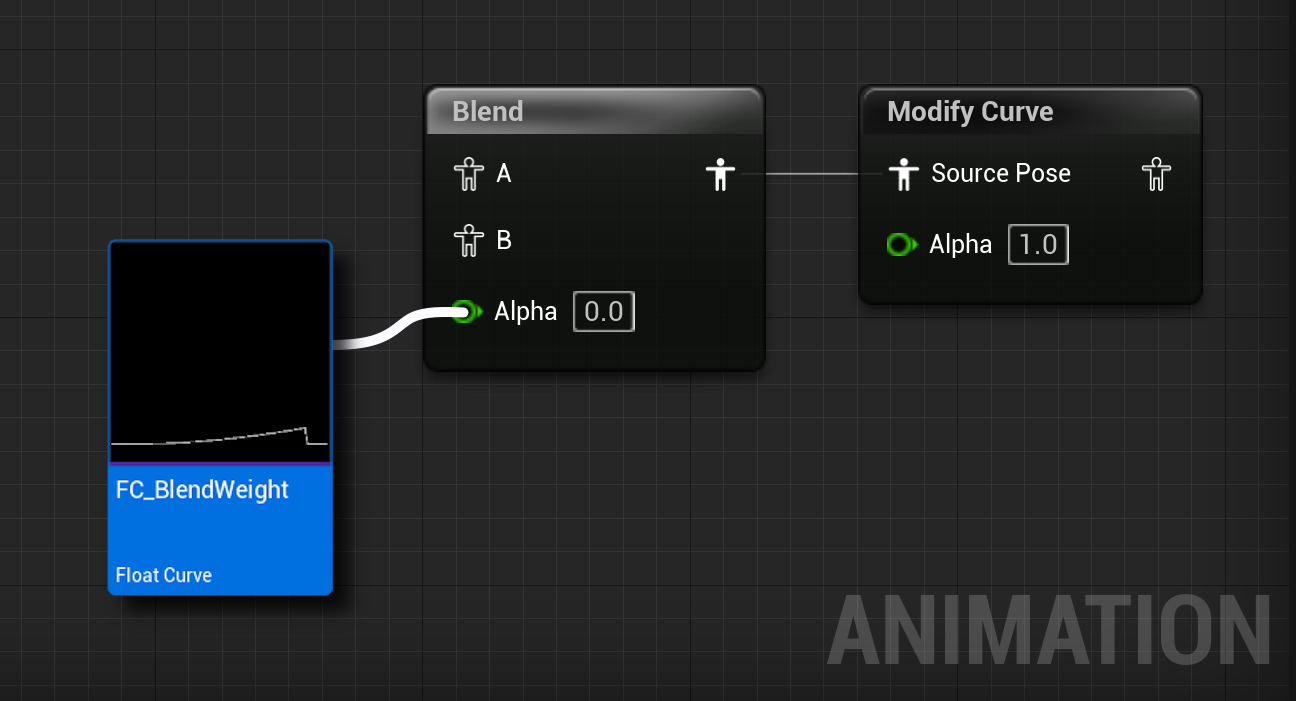
For this example, I will implement a basic node that blends two poses. The blend weight will be determined by a Curve asset, which is evaluated in a loop. Then we will use the Modify Curve node to relay curve information to the animation pipeline.
We’ll have to create AnimNode and AnimGraphNode classes in separate modules. It’s important that you define AnimNode classes in a Runtime module and AnimGraphNode classes in an Uncooked Only module. Otherwise you’ll get a warning and potentially issues when packaging.
In your plugin or project file, add the module definitions. Here’s where we can specify that it’s an UncookedOnly module.
{
    "Name": "AnimCode",
    "Type": "Runtime"
},
{
    "Name": "AnimCodeEditor",
    "Type": "UncookedOnly"
}
It’s also good practice to add OverridePackageType = PackageOverrideType.GameUncookedOnly; to your module’s Build.cs file. Unreal code rarely does this and the .uproject code above will work. But still it won’t harm doing this and it will be more explicit to anyone reading the code.
In our AnimNode class you can declare any UPROPERTY that you want to expose to the user. We will also declare a UCurveFloat reference so that users can link assets from the Editor. We will also declare our Blend node of type FAnimNode_TwoWayBlend and a FAnimNode_ModifyCurve node, which we’ll use to relay the blend weight as an animation curve for any system that wants to consume it. You can declare as many anim nodes as you wish.
The ModifyCurve node is a very useful tool and you should use it for specific animation trees to communicate something to the rest of the system. For instance, you can have the jump animation logic use this node to disable Feet IK while the jump is active. This assumes you have a curve e.g. DisableFeetIK that gets evaluated and used as the Alpha for the Feet IK nodes.
public:
    // Exposed pose pin
    UPROPERTY(EditAnywhere, BlueprintReadWrite, Category = Links)
    FPoseLink PoseA;

    // Exposed pose pin
    UPROPERTY(EditAnywhere, BlueprintReadWrite, Category = Links)
    FPoseLink PoseB;

    // Curve asset will be available in the details panel
    UPROPERTY(EditAnywhere, BlueprintReadWrite, Category = Blend)
    UCurveFloat* BlendWeightCurve = nullptr;

    // The curve name we'll use in ModifyCurve
    UPROPERTY(EditAnywhere, BlueprintReadWrite, Category = ModifyCurve)
    FName CurveName;

private:
    // Blend node
    FAnimNode_TwoWayBlend   mBlend;
    FAnimNode_ModifyCurve   mModifyCurve;

    // Blend weight control variables
    float                   mBlendWeight = 0.f;
    float                   mCurveTime = 0.f;
On initialization, we will connect the pins under the hood. We have to make sure that mBlend is initialized since this node already has some pins that need to be connected. Since this node is now hidden from the user we must connect them in code. Note that mBlend already contains FPoseLink references, we can just copy ours to them since these are simple structs representing runtime animation pins.
To connect any two existing AnimNodes we do this via their FPoseLink. We’re connecting mBlend to mModifyCurve by calling SetLinkNode. This is the same as dragging the pose pin in the Editor. From this point onwards we can forget about mBlend since the leading node is now mModifyCurve. Notice how we call Initialize_AnyThread on mModifyCurve, but not on mBlend.
void FAnimNode_NestedNodes::Initialize_AnyThread(const FAnimationInitializeContext& Context)
{
    DECLARE_SCOPE_HIERARCHICAL_COUNTER_ANIMNODE(Initialize_AnyThread)
    FAnimNode_Base::Initialize_AnyThread(Context);

    // Connect pins to our two way blend, set to float type
    mBlend.A = PoseA;
    mBlend.B = PoseB;
    mBlend.AlphaInputType = EAnimAlphaInputType::Float;
    mBlend.Alpha = 0.f;

    // Connect blend node to modifyCurve node
    mModifyCurve.SourcePose.SetLinkNode(&mBlend);
    if (CurveName != NAME_None)
    {
        mModifyCurve.CurveMap.FindOrAdd(CurveName) = 0.f;
    }

    // This will internally call Initialize for mBlend
    mModifyCurve.Initialize_AnyThread(Context);
}
For the Update and Evaluate methods we only have to bypass to the anim node that we’re using internally. We will also update the blend weight based on the curve that we exposed as a UPROPERTY. Finally, we will update the exposed curve value as a runtime animation curve.
It’s important to note that no matter how many nodes we’re using, you only have to update and evaluate one of them, the one that gives you the output pose for your custom node. This one will update and evaluate any pose links that you’ve connected to them recursively.
void FAnimNode_NestedNodes::Update_AnyThread(const FAnimationUpdateContext& Context)
{
    DECLARE_SCOPE_HIERARCHICAL_COUNTER_ANIMNODE(Update_AnyThread);

    // Update the blend node alpha based on our input curve
    UpdateBlendWeight(Context);

    // Here we just update our blend node, and it will internally evaluate our source Poses A and B
    mModifyCurve.Update_AnyThread(Context);
}

void FAnimNode_NestedNodes::Evaluate_AnyThread(FPoseContext& Output)
{
    DECLARE_SCOPE_HIERARCHICAL_COUNTER_ANIMNODE(Evaluate_AnyThread);

    // This will internally call the evaluation of our source poses
    mModifyCurve.Evaluate_AnyThread(Output);
}
DECLARE_SCOPE_HIERARCHICAL_COUNTER_ANIMNODE is a macro used all over animation code for profiling. It’s good practice to add it so that Unreal’s profiling tools will pick up animation nodes properly.
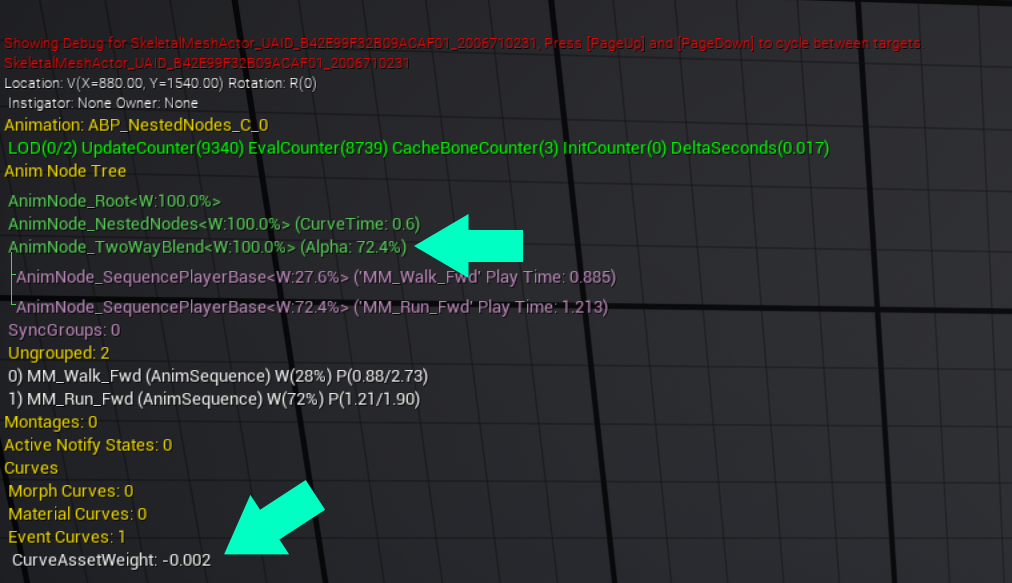
We’ll also implement GatherDebugData indicating extra information that will show up when enabling animation debug. You do this by using the showdebug ANIMATION command from the console in the Editor or while playing. One thing to note with this one is that we’re not calling mModifyCurve.GatherDebugData(...) because that AnimNode isn’t implementing it. So we call mBlend so that the debug information on it isn’t lost.
void FAnimNode_NestedNodes::GatherDebugData(FNodeDebugData& DebugData)
{
    DECLARE_SCOPE_HIERARCHICAL_COUNTER_ANIMNODE(GatherDebugData)
    FString DebugLine = DebugData.GetNodeName(this);
    DebugLine += FString::Printf(TEXT("(CurveTime: %.1f%)"), mCurveTime);
    DebugData.AddDebugItem(DebugLine);
    mBlend.GatherDebugData(DebugData);
}
Using the showdebug ANIMATION command we can see all debug data reported by AnimNodes. In our case we added the curve time and the weight that’s being output as an Animation Curve.
Finally, here’s how we evaluate the curve asset in order to blend from one pose to another. We only need to take care of looping the curve evaluation over time. The FAnimationUpdateContext contains the DeltaTime required for this evaluation. We will also update the curve value on mModifyCurve.
void FAnimNode_NestedNodes::UpdateBlendWeight(const FAnimationUpdateContext& Context)
{
    if (BlendWeightCurve == nullptr || BlendWeightCurve->FloatCurve.Keys.Num() == 0)
    {
        return;
    }

    const float DeltaTime       = Context.GetDeltaTime();
    mCurveTime                  += DeltaTime;
    const float CurveDuration   = BlendWeightCurve->FloatCurve.Keys.Last().Time;
    mCurveTime                  = FMath::Fmod(mCurveTime, CurveDuration);
    mBlend.Alpha                = BlendWeightCurve->GetFloatValue(mCurveTime);

    if (CurveName == NAME_None)
    {
        return;
    }
    // Update modify curve value
    mModifyCurve.CurveMap.FindOrAdd(CurveName) = mBlend.Alpha;
}
All that remains is for users to use our new Anim Node and connect some animations to it. Clicking on the new Blend by Curve node will show the Curve asset reference in the Details panel. Our update function will evaluate the curve over time and set the blend weight to our internal Blend node. Note that I renamed the node title from NestedNodes to Blend by Curve to make it fancier.